- After download extract Backupfile.NBF file & just copy and paste it to memory card.
- Insert memory card to phone.
- Go to menu,gallery,memory card,
- Go to BACK-UP FILE.
- Tick restore,tick continue,tick DONE,restoring data
- Phone will restart...restore complete...DONE...now go to MUSIC PLAYER...and enjoy!!!
You’ll have your Gallery and Music Player running again, but again Flashing your phone is better and recommended solution. Best Of Luck
Thursday, August 09, 2012
NOKIA 5130c/2700c Not Enough Memory Solution [No need to flash]


Sunday, July 22, 2012
Import nokia contacts to iphone
Found tested
Copying Contacts from Nokia Phone to MS Outlook
Step 1:
You need to Install Nokia PC suite on your machine, if you do not have it already. Also, You need to have MS outlook or outlook express installed on your computer.
Connect your Nokia Phone to your computer using data cable or Bluetooth.
Step 2: [Updated]
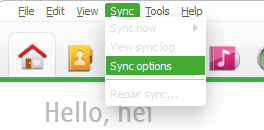
Go to Sync >> Sync Options.
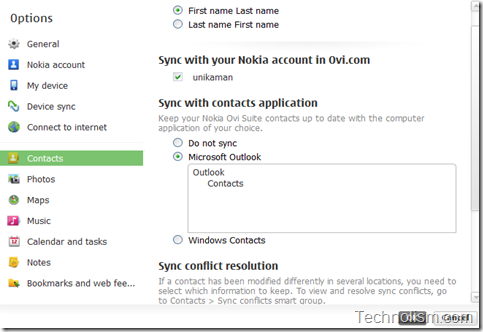
Now, click on ‘Contacts’ in the left section, and then select the option “Microsoft Outlook” (radio button) under the section “Sync with contacts application.” Now, click on OK in this window.
Step 3: [Updated]
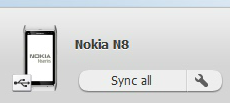
Now, click on ‘Sync’ button for contacts in the Ovi application home. You will find this in the lower left corner when you click on the Home Tab or Contacts Tab on your Nokia Ovi Suite. If you want to sync all you data, you can click on ‘Sync All’ option which is shown in the Home tab, or you can click on ‘Contacts’ tab and this same button will change to ‘Sync Contact’ clicking on which you will be able to sync only your contacts.
[As I no longer have my Nokia 5800 with me, I have shown below a screen grab from Nokia help section.]
This synchronises the contacts from your Nokia with your MS outlook, this will transfer all your phone contact to MS outlook.
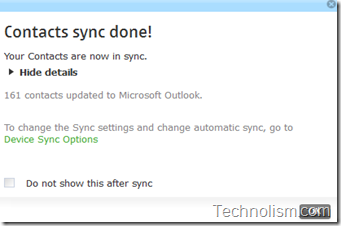
After you get the above confirmation message, close the Nokia PC suite, disconnect Nokia Phone from computer.
Copying Contacts from MS Outlook to iPhone
Once the Steps 1-3 are completed, all your contacts are copied to MS Outlook on your machine.
Step 4:
Connect the Apple iPhone to your computer and launch Apple iTunes software. Click on your iPhone Device in the left tab on iTunes which will show the summary of your iPhone.
Step 5:
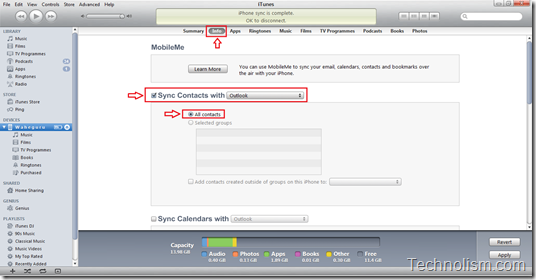
Click on the Info tab for your Apple iPhone.
Click on the check box for “Sync Contacts with” and leave the value selected as default i.e. Outlook. Leave the option selected as All Contacts below that. Refer to the screenshot below. (Click to enlarge)
Step 6:
Click on the Apply button.

iTunes will start syncing your Microsoft Outlook contacts on to your new iPhone and once it gets completed, you can see all your Nokia Phone contacts on your new iPhone.
And, you are done!!
You can use the same steps above to copy the contacts vice-a-versa as well, that is, from your iPhone to Nokia. Also, this can be used to transfer contacts between any other phone (which gives the option to sync with Outlook) and iPhone.
Hope you find this post easy and informative. How do you transfer contacts between your phone, do share with us if you have a better way of doing it.
original here
Copying Contacts from Nokia Phone to MS Outlook
Step 1:
You need to Install Nokia PC suite on your machine, if you do not have it already. Also, You need to have MS outlook or outlook express installed on your computer.
Connect your Nokia Phone to your computer using data cable or Bluetooth.
Step 2: [Updated]
Go to Sync >> Sync Options.
Now, click on ‘Contacts’ in the left section, and then select the option “Microsoft Outlook” (radio button) under the section “Sync with contacts application.” Now, click on OK in this window.
Step 3: [Updated]
Now, click on ‘Sync’ button for contacts in the Ovi application home. You will find this in the lower left corner when you click on the Home Tab or Contacts Tab on your Nokia Ovi Suite. If you want to sync all you data, you can click on ‘Sync All’ option which is shown in the Home tab, or you can click on ‘Contacts’ tab and this same button will change to ‘Sync Contact’ clicking on which you will be able to sync only your contacts.
[As I no longer have my Nokia 5800 with me, I have shown below a screen grab from Nokia help section.]
This synchronises the contacts from your Nokia with your MS outlook, this will transfer all your phone contact to MS outlook.
After you get the above confirmation message, close the Nokia PC suite, disconnect Nokia Phone from computer.
Copying Contacts from MS Outlook to iPhone
Once the Steps 1-3 are completed, all your contacts are copied to MS Outlook on your machine.
Step 4:
Connect the Apple iPhone to your computer and launch Apple iTunes software. Click on your iPhone Device in the left tab on iTunes which will show the summary of your iPhone.
Step 5:
Click on the Info tab for your Apple iPhone.
Click on the check box for “Sync Contacts with” and leave the value selected as default i.e. Outlook. Leave the option selected as All Contacts below that. Refer to the screenshot below. (Click to enlarge)
Step 6:
Click on the Apply button.
iTunes will start syncing your Microsoft Outlook contacts on to your new iPhone and once it gets completed, you can see all your Nokia Phone contacts on your new iPhone.
And, you are done!!
You can use the same steps above to copy the contacts vice-a-versa as well, that is, from your iPhone to Nokia. Also, this can be used to transfer contacts between any other phone (which gives the option to sync with Outlook) and iPhone.
Hope you find this post easy and informative. How do you transfer contacts between your phone, do share with us if you have a better way of doing it.
original here
Saturday, July 21, 2012
How to Setup EDGE / GPRS on Your iPhone
Before following this guide, contact your carrier and ask them to enable EDGE/GPRS and send you settings for iPhone (APN).
Here’s your part of job:
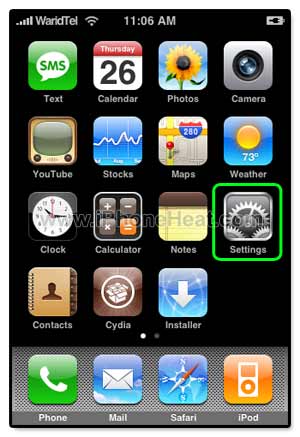
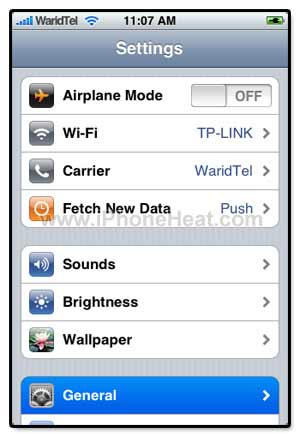
Press Settings icon from SpringBoard of your iPhone. and then go to General Menu.
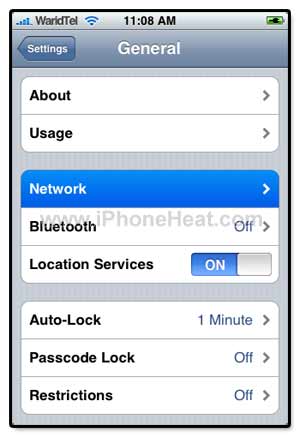
Press Network Menu and then go to Cellular Data Networking.
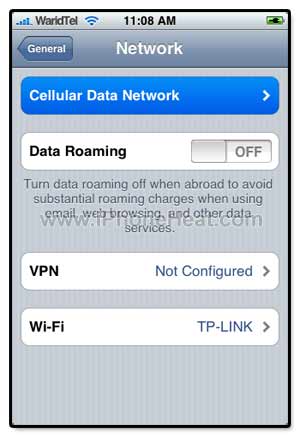
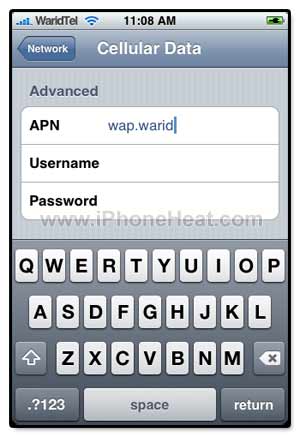
Now, under APN field, enter the APN that you received from your Carrier.
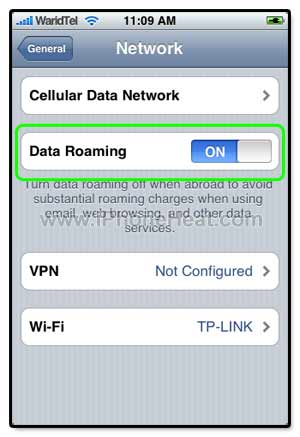
If you want to use EDGE right now. Press network button at top left (left screen shot) then turn Data Roaming ON.
Now you have Setup Edge / GPRS on your iPhone and ready to surf internet.
Here’s your part of job:
Press Settings icon from SpringBoard of your iPhone. and then go to General Menu.
Press Network Menu and then go to Cellular Data Networking.
Now, under APN field, enter the APN that you received from your Carrier.
If you want to use EDGE right now. Press network button at top left (left screen shot) then turn Data Roaming ON.
Now you have Setup Edge / GPRS on your iPhone and ready to surf internet.
Don’t forget to turn data roaming OFF when you’re done with internet usage. otherwise it will keep running resulting in a big iPhone Bills
Thursday, July 19, 2012
P1000 flashing guide froyo 2.2 to 2.3.3 gingerbread here
Here is flashing guide of p1000 froyo 2.2 to 2.3.3 gingerbread
why i use 2.3.3? because in 2.3.6 there is screen problem
tools to be needed
usb cable for tab
pit and odin http://s323.hotfile.com/get/5faf0119...din3-v1.83.rar
tar file http://fileshare3070.depositfiles.co...P1000XXJPZ.zip
dbdata tar http://199.91.152.43/59ob8233b6fg/45...mu1/dbdata.zip
here is the procedure
1. put in download mode tab by pressing volume down and then on you
will see in the screen download mode appear
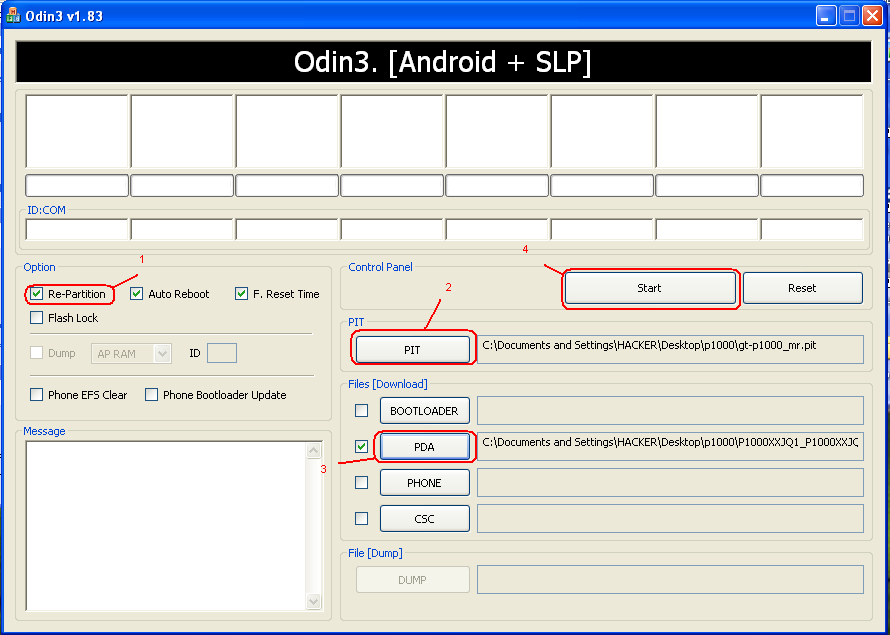
2. run odin 1.83
3. check the re partition
4. put file in pit tab
5. put file in pda tab home tar
6. click start and wait till finish flash and pass
see image like this
now your tab is finish flashing and stuck in samsung logo dont be alert
again flash it with db data for wiping cache
1. put again in download mode pressing volume down and on
2. uncheck the re partition
3. put file in pda tab the file dbdata tar
4. click start wait till finish flash and pass
image like this
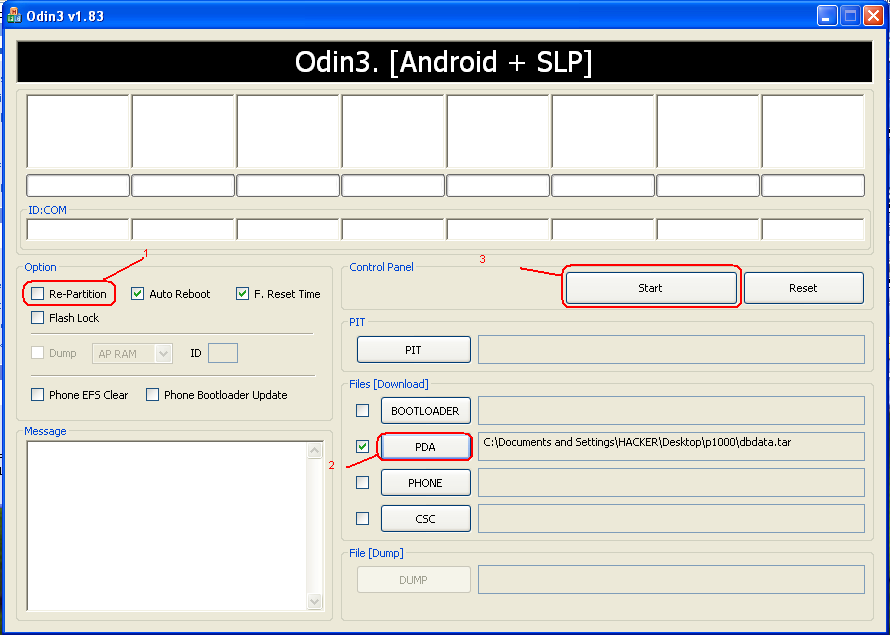
now your tab is running in 2.3.3 ginger bread
remember please follow instructions above we are not responsbile
to brick your tab
why i use 2.3.3? because in 2.3.6 there is screen problem
tools to be needed
usb cable for tab
pit and odin http://s323.hotfile.com/get/5faf0119...din3-v1.83.rar
tar file http://fileshare3070.depositfiles.co...P1000XXJPZ.zip
dbdata tar http://199.91.152.43/59ob8233b6fg/45...mu1/dbdata.zip
here is the procedure
1. put in download mode tab by pressing volume down and then on you
will see in the screen download mode appear
2. run odin 1.83
3. check the re partition
4. put file in pit tab
5. put file in pda tab home tar
6. click start and wait till finish flash and pass
see image like this
now your tab is finish flashing and stuck in samsung logo dont be alert
again flash it with db data for wiping cache
1. put again in download mode pressing volume down and on
2. uncheck the re partition
3. put file in pda tab the file dbdata tar
4. click start wait till finish flash and pass
image like this
now your tab is running in 2.3.3 ginger bread
remember please follow instructions above we are not responsbile
to brick your tab
Wednesday, July 18, 2012
Download Most Wanted China Phone Application (Tomcat,Puffgirl,Wangcuo,AngryBirds)
Most Wanted China Phone Application (Tomcat,Puff girl,Wangcuo,Angry Birds)


Instruction To Install : First Connect Your Phone With Data Cable & Select Mass Storage.Copy All Folder & Files In Your Phone Mass Memory.
DOWNLOAD
Most Wanted China Phone Application V2 (Tomcat,Puffgirl,Wangcuo,AngryBirds)
Application Collection Updated.
http://www.4shared.com/rar/bt7VMchs/...ne_Applic.html
Monday, June 25, 2012
iPhone Backup with iTunes using WiFi & USB Cable
iPhone Backup with iTunes using WiFi & USB Cable

iTunes have a default option that will automatically create a backup each time you connect your iPhone to your computer. If you want to manually create an
iPhone backup though, it’s easy follow the steps below.
Step
1
Connect your iPhone to your computer using USB cable

Step
2
Launch iTunes

Step
3
Select your iPhone from the left bar list and right Click on it and Select “Back Up”
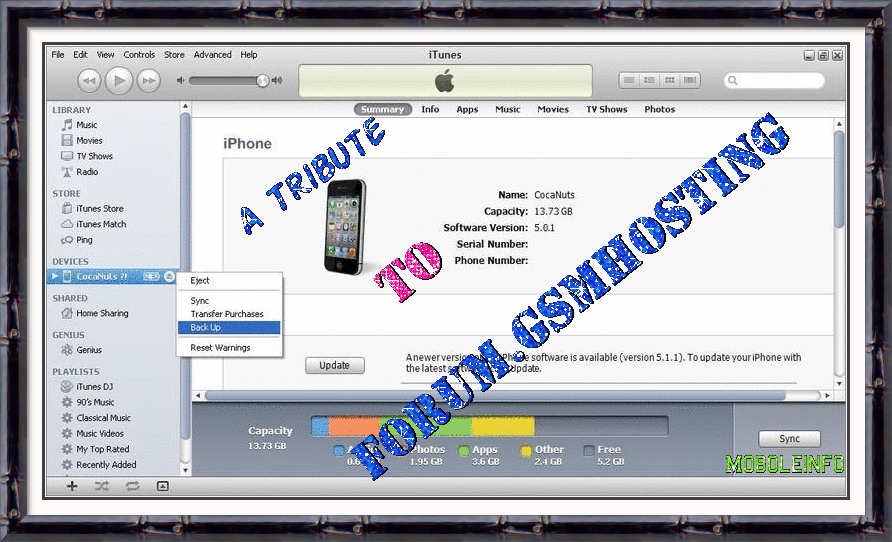
Step
6
Now your device will start backing up you can take a cup of tea until the end of the back up.
This backup will let you able to restore without losing any data this tutorial is the same for Mac and Windows also this tutorial is compatible with iPhone, iPod Touch and iPad.
Backup is the best way to keep your date away for losing, for that reason we have another instructions will help you to back up your date but with iCloud to be more certain about your content.
Note
you have to know also that this instructions also support your iPhone, iPod and iPad , and can’t be done without Wi-Fi source
Backup with Wi-Fi
using icloud
Step
1
Connect your Device to a WiFi source to backup using iCloud go to Settings –> Wi-Fi –> Turn ON –> Choose your Wi-Fi source.

Step
3
After connecting your iPhone to your Wi-Fi source tap settings again then tap on “iCloud” and scroll to the bottom, then tap on “Storage & Backup”


Step
4
Navigate down and tap on “Back Up Now”

iOS will give you a progress bar to watch the percentage of progress Remember: your i-device is connect to a Wi-Fi source.
Subscribe to:
Posts (Atom)